
 On to the next tutorial, this one is a topic that every now and then appears at my mailbox: the cc-line! This process is much more brains than numbers, so I'll give some tips along the way. That said, let's get to work!
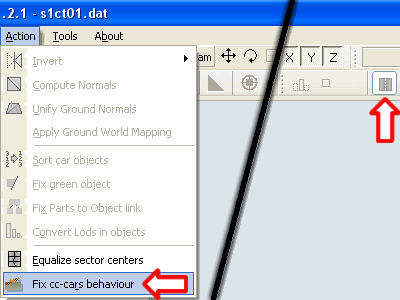
Step 1 - Before starting, open your .dat file and select Fix cc-cars behaviour from the Action menu. Also, turn on the cc-line display by clicking the Show CC-Line button on GP4Builder's toolbar (right arrow on the picture).
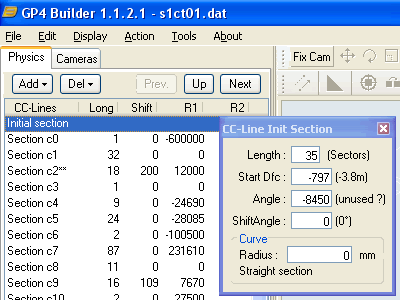
Step 2 - In the Physics tab, double-click CC-Line on the left of the screen. Select Initial section, Del, All Following Sections. Now you can start making the cc-line for your track.

Step 3 - This is the initial section of the cc-line, the only one that's left. Length speaks for itself, Start Dfc is how much it is to the left or to the right of the track (here a value of 1024 equals 1 GP4 unit, 16 feet = 4.877 meters). Radius is the turn radius in milimeters, set it to zero if it's a straight. For a description of Angle and ShiftAngle refer to GP4Builder User Guide because we'll not be using them much here.

Step 4 - I want the cc-line to start in the right side of the track, so I set a positive value to Start Dfc (620 in this example), and I extended its length to 60 track sectors because there's a long straight to go. To go on, click on the Add button on the left of the screen, then Section.
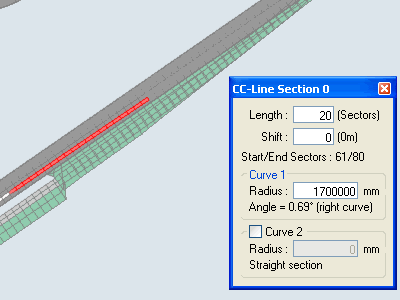
Step 5 - Now, let's make the cc-line go towards the right edge of the track as the first corner is a left-hander. This can be done slightly by setting a large radius, 1700000 over 20 sectors in this example. Remember this: a large radius gives slight, open turns while a small radius gives a tight, slow turn. Values smaller than 2000 are not of much use and may lead to game crashes. Negative values turn left and positive values turn right.
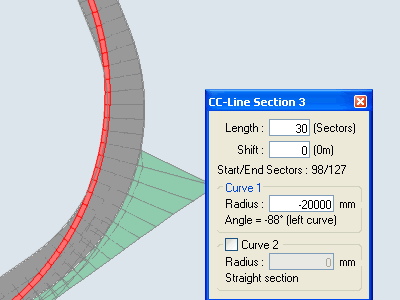
Step 6 - After a bit we arrive at the first corner. Cars aim to make the turn with the highest radius possible, so we need to do that. Set a lenght of more sectors than you'll need, then start playing with the radius until you hit the turn apex. If the cc-line goes off-track on the inside (like the picture), the radius is too small. If it goes off-track on the outside, the radius is too big. If it hits the apex correctly but does not hit the track edge on corner exit, then make the previous section one sector shorter and then adjust radius again.

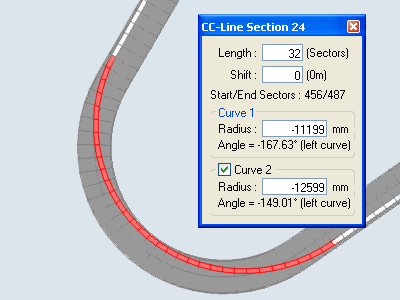
Step 7 - Notice that, in my solution, I checked the Curve 2 checkbox. This means that instead of a circle, this cc-line section will follow an ellipse in which the two radii values are actually the two semiaxes of that ellipse. No good at maths? Well, the only thing you need to know is that the cc-line section will start with the Curve 1 radius and finish with the Curve 2 radius. In this example, the cars will accelerate as the turn goes on because the radius increases. Sections with decreasing radius should be avoided unless they're really necessary.
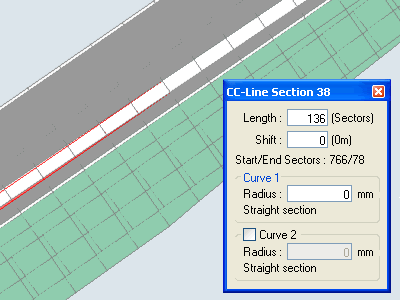
Step 8 - When you reach the start/finish line again, make the last cc-line section go after the line, and make its end contact with the first cc-line sectors as close as you can. You may need to adjust previous sectors to achieve that. You'll only know if your cc-line is good enough by watching computer cars driving in game, so be sure to test a lot until you're really satisfied with the results.
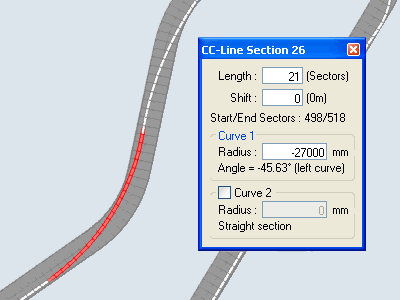
Tip 1 - There are some corner combinations that make you sacrifice the first corner in order to have a better line for the second one, like the left-right in this picture. The radius of the left turn is just enough to get a good line in the right corner that follows. So always make the cc-line looking at what you have in the following sectors. Onboard videos are very useful if you're working on a real track.
Tip 2 - Do not use two cc-line sections in the same corner. This can make cc-cars brake mid-corner when they approach the second section. This can be avoided by using the Curve 2 option correctly.

Tip 3 - Sometimes you may need to use very small cc-line sections to make an adjustment, for corner entry for example. This will not cause the problem from Tip 2 if the section is short enough for cc-cars not to hit the throttle again, so they will not brake a second time to enter the following section.

Tip 4 - A cc-line can be improved as you progress on your track, for example, kerbs, elevations and banking may change the best way to approach a corner. Specially kerbs! So don't be afraid to do your cc-line all over again, if it's for better. Even the ones from GP4 original tracks can be improved, keep that in mind.
There it is, also remember that pitlane does not have a cc-line of its own, instead the pitlane commands guide the cars through pitlane. The .dat file I used to make this tutorial is available in our downloads section, in the Unfinished .dats folder. See you later!
1 comment:
better late than never but you did a really good job with this visual tutorial.
It's clear and concise.
[Lo2k]
Post a Comment