Pages

February 27, 2009

De volta para o futuro...


Só para os desatentos: é Fuji Speedway, baseada no último evento de 2008.

Os demais projetos continuam andando. Inclusive uma versão de Assen prum amigo nosso.

PS: TTM, espero que isso te empolgue pra voltar.

@Tero, valeu pelo comentário.

Aliás, dividi a pista em quatro fatias, de modo a desenvolver cada uma por vez, em sequência, e só passando de uma pra outra quando estivesse 100% concluída a última. Isso adianta meu esforço com menores objetos que certamente serão utilizados em fatias seguintes.


For dummies: it´s Fuji Speedway, based on last 2008 event.

Other projects being carried on, including an Assen version for a friend of us.

PS: Tero, hope this tease to get back.

@Tero, thanks for feedback.

By the way, I split track into four slices, so that I´ll only pass through from one to another since I have 100% finished last one. This helps me once it forces me to create new stands, smaller objects that will be used for next slices. I think you TTM would help me a lot with textures and some 3d objects you would like to create by your own... Don´t hurry at all, and please post me.

February 17, 2009

Jogo dos sete erros - versão Istanbul


Aprendi que não devo inventar muito, e partir do princípio que mais importam as volumetrias do que detalhes que passariam, invariavelmente, despercebidos de dentro de um carro a 300Km/h.

As pistas originais do GP4 são excelentes referências para quem quer produzir bons trabalhos para essa plataforma de simulação, tanto em termos de gráficos, quanto desempenho.

Estas vão ser as últimas imagens de nosso projeto para Istanbul. Agora, Fuji.


I´ve learnt I won´t get pissed on details that will never be seen from a 300km/h car.

Standard tracks of GP4 are, surely, best tutorial for those who want to create good track, both in graphics and processor performance.

These will be our last shots for Istanbul. Next, Fuji.

February 11, 2009

Tudo é verdade


Para ser real, tem que ser por inteiro.
O prédio dos boxes já está pronto, com adaptações pra que nenhum carro apareça no meio de uma parede. Só falta mapear.

Depois alguns pequenos detalhes, e tô livre pros próximos projetos.


To be real, you have to be whole.
Pitbuilding is already positioned in correct place now. Some changes were made to avoid cars crossing walls. All I need now is to assign textures.

Later some small details, and I´m free for next projects...

February 08, 2009

Passo-a-passo: Inserindo uma imagem do Google Earth

Depois de uma bela hibernada, esta seção volta com um assunto bastante perguntado ultimamente: como inserir uma imagem do Google Earth no GP4Builder para construir uma pista. Esse tutorial exige o uso de um programa externo para edição de imagens, à escolha do freguês.

Antes de começarmos, é bom lembrar que um dos motivos da hibernação dos tutoriais foi a falta de assunto, então se alguém tiver alguma idéia pra outro tópico a abordar, avise-nos!
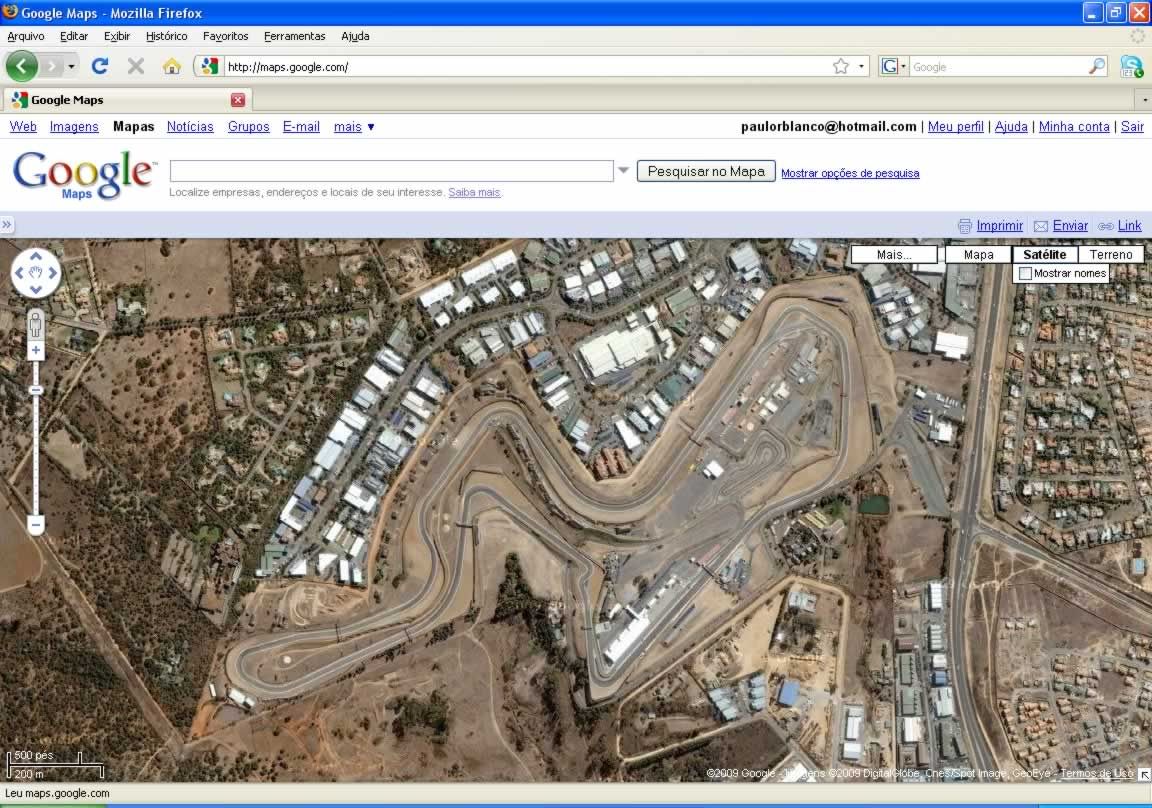
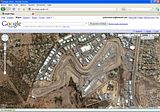


Passo 1 - O mais óbvio, encontre sua pista no mundo. Use o Google Maps e não o Google Earth, simplesmente porque o Google Earth é redondo e o Google Maps é plano, e vamos trabalhar com coisas planas no GP4Builder.
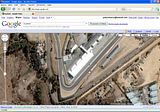


Passo 2 - Quanto mais perto melhor, então aproxime a imagem até ter uma resolução razoável. O que é razoável? Se a largura da pista na tela for metade da largura do seu dedo da mão, dá pra dizer que é razoável. Nada exato, mas serve pra dar uma idéia.
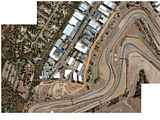


Passo 3 - 
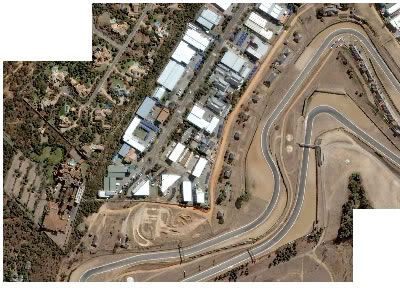
Escolhida a resolução, use um programa de edição de imagens (Photoshop por exemplo) e a tecla PrintScreen para montar um quebra-cabeça com as fotos da pista. Basta tirar várias fotos e encaixá-las no seu programa de imagens. Como o procedimento exato depende do programa, não vou detalhar este passo.
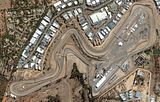


Passo 4 - Quando terminar o quebra-cabeça com toda a pista, áreas de escape e alguns edifícios próximos que julgar importante, salve a imagem em formato .tga de 32 bits. Como escolher esse formato, novamente o procedimento exato depende do seu programa de imagens, mas não é algo que estará muito escondido.


Passo 5 - 
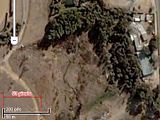
O mais importante: qual o tamanho desse mapa? Por sorte, o pessoal do Google nos presenteou com essa escala gráfica. Ainda usando seu programa de imagem, meça quantos pixels correspondem à escala gráfica em metros no canto da tela do Google Maps, nesse caso 50 metros correspondem a 93 pixels.


Passo 6 - De volta a terreno conhecido, abra no GP4Builder um arquivo .gp4 de pista qualquer e seu .dat correspondente, por exemplo, montreal2001.gp4 e s1ct08.dat - dê preferência a pistas que possuem o pitlane no mesmo lado da pista que você está construindo. Na aba Graphics, dê duplo clique em Scenes, depois Add, New Scene.


Passo 7 - Vamos criar o objeto que vai ser o mapa no GP4Builder. Clique novamente em Add, depois New Object. Agora vem a razão da escala gráfica: nesse exemplo, meu arquivo .tga do mapa tem 2816x1792 pixels (isso é um tamanho bom), qual o tamanho do objeto correspondente? Para a largura, a relação é 2816/93*50 = 1513,978. Fazendo a mesma coisa para a altura (1792/93*50), temos 963,441. Então o tamanho do objeto é 1513,978 na largura (X) e 963,441 na altura (Y). Coloque esses valores nos campos correspondentes da linha Size, e finalmente clique em Create.


Passo 8 - Para limpar o visual, ligue a opção Show selected scene only, ou apague as outras Scenes se achar mais conveniente.


Passo 9 - Abra o objeto recém-criado dando dois cliques em seu nome na lista à esquerda da tela. Na janela que se abrir, clique em Add, e digite o nome do arquivo .tga do mapa na janela Add New Texture, em seguida clique em Add to list. Lembrando que o .tga deve estar na mesma pasta que seu .gp4.


Passo 10 - Aí está nosso mapa, pronto para servir de base para um arquivo .dat, com todo o realismo que a foto de satélite proporciona.


Dica - Quando for construir o .dat, ligue as opções Ortographic View e Fix Cam, dentro de Physics options marque Wireframe e desligue Plain, e desligue Rotate/Zoom Mode em Preferences, no menu Tools. Assim você consegue aproveitar melhor a foto, sem as distorções da perspectiva 3D.

Google Maps © 2009 Google, Imagens © 2009 DigitalGlobe, Cnes/Spot Image, GeoEye

Step-by-step: Inserting a Google Earth picture

After a long hibernation, this section comes back with a subject asked quite a lot lately: how to insert a Google Earth picture in GP4Builder for track building. This tutorial requires an external image editing software of your choice.

Before we start, I shall remember that one of the reasons for the tutorial sleep was that I couldn't find much to talk about, so if someone has an idea for a new topic, just tell us!


Step 1 - Obviously, find the track you wish. Use Google Maps instead of Google Earth, simply because Google Earth is round and Google Maps is flat, and we're going to use flat surfaces in GP4Builder.


Step 2 - The closer the better, so zoom in until you get a good resolution. How good? An approximate measure is that track width on screen should be at least half of your fingers' width. Not precisely like that, just an estimate.


Step 3 - Resolution chosen, use an image editing software (Photoshop for example) and PrintScreen to set up a jigsaw with the track's pictures. Just take many screens and put them together with your software. The exact procedure varies between different programs, so I won't go deeper in this.


Step 4 - When you finish the jigsaw with the whole track and run-offs, and some buildings you believe are important, save the image as a 32-bit .tga file. Again how exactly this is done depends on your software, but shouldn't be hard to find.


Step 5 - Extremely important: how big is this map? Luckily, the guys at Google gave us a scale. Still using your image editing software, measure how many pixels is the meter scale. In this example, 50 meters equal 93 pixels.


Step 6 - Back to the known, open in GP4Builder any track's .gp4 file and its corresponding .dat, for example, montreal2001.gp4 and s1ct08.dat - preferably choose a track that has the pitlane the same side as the track you're building. In the Graphics tab, double-click Scenes, then Add, New Scene.


Step 7 - Now let's create the map object in GP4Builder. Click Add again, and New Object this time. Now we need that scale: in this example, my .tga file is 2816x1792 pixels big (which is a good size), how big should it's object be? Width-wise, it's 2816/93*50 = 1513.978. Same for height (1792/93*50), we get 963.441. So the object's size is 1513.978 width (X) and 963.441 height (Y). Put these values in the respect fields in the Size row. Finally, click Create.


Step 8 - To see clearer, turn Show selected scene only on, or delete the remaining Scenes if you find it more convenient.


Step 9 - Open the newly-created object double-clicking its name on the object list on the left of the screen. In the window that opens, click Add and type your map .tga's filename in the Add New Texture window, then click Add to list. Just to remember, the .tga and .gp4 files must be in the same folder.


Step 10 - There is our map, ready to be a base for a .dat file, with all the realism we can get from a satellite photo.


Tip - When building the .dat, turn Ortographic View and Fix Cam on, in Physics options turn Wireframe on and turn Plain off, and turn off Rotate/Zoom Mode in Preferences, Tools menu. This way you get the most of the picture, without the distortion of 3D-perspective.

Google Maps © 2009 Google, Imagery © 2009 DigitalGlobe, Cnes/Spot Image, GeoEye

February 03, 2009

Quase lá (versão hungria)


Graças ao bom trabalho do Laurent Lo2k e algumas mudanças minhas.


Thanks to main adjustments by Laurent and some changes of mine.

Singapura (extreme makeover)


Singapore propõe mudanças em prol de ultrapassagens

O circuito de Marina Bay passará por mudanças no traçado consagrado na última temporada de Fórmula 1.

Após discussões entre organizadores, equipes e FIA, foi divulgado que serão realizadas pequenas modificações nas curvas 1, 13 e 14 para forçar ultrapassagens entre carros, e mudanças significativas na entrada e saída do pitlane para aumentar a segurança dos pilotos. Também sofrerá melhorias o asfalto de trechos rápidos da pista, entre curvas 5 e 7.

Nós do F1 virtual resolvemos simular o que deve acontecer nesses exemplos acima, mas desde já reconhecemos que a mudança na curva 1 é absolutamente desnecessária.


Singapore in bid to boost overtaking

(extracted from http://www.itv-f1.com)

Monday, 02 February 2009 10:45

The Marina Bay circuit, which plays host to Formula 1’s night race in Singapore, will undergo layout changes in a bid to boost overtaking ahead of its second grand prix later this year.

The sport’s inaugural floodlit race was widely hailed as a big success last September, but organisers have wanted to improve the racing spectacle for 2009 and have now announced track alterations following discussions between themselves, the teams and FIA.

These are headlined by minor changes to turns one, 13 and 14 to try and give drivers a better opportunity to attempt a passing move.

In addition the controversial pit lane entry, which used the exact same piece of track as cars on a flying lap and saw Nick Heidfeld and Rubens Barrichello penalised for an incident there in 2008, and exit will be revised, while improvements to the bumpy track surface will be made between turns five and seven.

“While the circuit and the event exceeded expectations around the world, as with any brand new event, there are always things which we now know we can do better,” said Singapore’s technical and race operations director, Michael McDonough.

“Minor modifications are proposed on the track, at Turns one, seven and 14 in order to improve overtaking opportunities whilst the main changes will be to the pit entry and pit exit to provide added margins of safety for cars entering and leaving the pit lane.”

Organisers say changes to the first corner will involve moving the corner apex and reducing the corner radius in a bid to reduce entry speeds and give drivers more of an opportunity to try an out-braking move into the turn.

And after drivers took advantage of a concrete verge to take a wide line into the corner last year, kerbing will also be installed on the entry so to force drivers to take a narrower line.

Changes at turn 13 will see the previously tight left-handed hairpin, the turn immediately after the iconic Anderson Bridge, altered to increase cornering speeds so cars carry more speed down the next straight into the braking zone at turn 14.

In addition the geometry of turn 14 will be altered to give more overtaking chances under braking.
Meanwhile, the pit lane entry and exit changes will see a dedicated approach lane created, with the vast run-off areas around the final turn reduced, while the exit will be extended past the first turn so drivers now feed back onto the circuit off the racing line at turn two.

We, from F1 virtual, decided to simulates what would be those changes, but for now we feel sorry for turn 1 cracking. We guess it´s totally unnecessary.