Pages

March 31, 2008

É preciso construir sobre a areia...

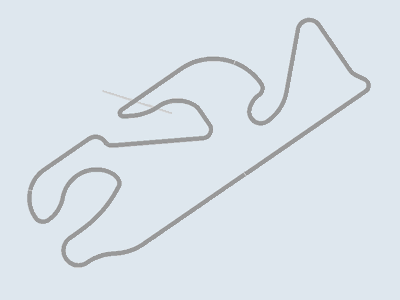
Tô realmente triste com o progresso de Sakhir.
Não deveria dizer “triste”, mas cansado.

Aqui é um blog e tal qual um que se preze a expor nossas - minhas e do Paulo – impressões acerca da manufatura de pistas, eu me sinto à vontade pra falar disso.

GP4 tem um limite para o uso de poligonais – não sei a tradução do inglês. É um limite justo, considerando a ocupação do processador evidente em máquinas de regular desempenho. Esse limite é acusado por mensagem no 3dbuilder.

Tal constatação me fez ter que refazer praticamente todos os objetos em 3d feitos até agora. Falo das grandes arquibancadas e torre de TV.

E na minha conta essa é a segunda grande reviravolta nesse trabalho, uma vez que eu praticamente refiz todo a parte de relevo após algumas mudanças que fizemos para aprimorar as elevações da pista.

Significa que essa é a quarta versão de Sakhir em que trabalho desde setembro do ano passado.

E isso me deixa realmente triste e cansado.

Mas o fruto desse contratempo é o aprendizado acumulado que evitará erros em futuros projetos.

Viva e aprenda. Eu ainda tenho muito dos dois pela frente.

Vamos lá. Que venha Bahrain!


I’m really sad about Sakhir progress.
I wouldn’t say sad, but tired…

As a blog, it means we – Paulo and me – must write here all of our impressions on track making. And that’s why I share with you this useless feeling.

GP4 has a poly limit that is fair, due to machine specifications and processor occupancy. Such limit is verified on Lo2k´s 3dbuilder.

So I have to almost re-build all 3d objects done so far. I mean grandstands and TV Tower.

And that’s the second main revamp on this work, as I have quite re-made whole land coverage as well, after some changes on elevations we both judge it would suits better and more realistic.

This mean it’s the 4th Sakhir version I work on, since September 2007.

And this makes me sad and tired.

But hopefully I’ll learn how not to get such mistakes again for next tracks.

Live and learn.

That’s what I hope for.

Let’s go for it, Bahrain!

March 30, 2008

Novos downloads

Olá,

Estamos inaugurando uma nova pasta dentro de nossa seção de downloads, .dats Inacabados. Esta pasta contém, como o nome diz, arquivos .dat que foram iniciados, não terminados e que não estão na lista de projetos para um futuro próximo. Estes arquivos são direcionados exclusivamente para quem está aprendendo a editar de pistas; não acompanham o arquivo .wad, necessário para o funcionamento no jogo.

Quem baixar os arquivos pode fazer literalmente qualquer coisa com eles. Se quiser desenvolver um .dat Inacabado, e um dia lançá-lo, por favor seja educado e coloque o seguinte texto dentro do arquivo readme.txt da pista:

This track is made from the unfinished .dat file **nome do arquivo** from F1Virtual site, f1virtual.blogspot.com. Special thanks to Prblanco and Gildoorf.

Esta pista foi feita de um .dat inacabado
**nome do arquivo** do site F1Virtual, f1virtual.blogspot.com. Agradecimentos especiais a Prblanco e Gildoorf.

**nome do arquivo** é o nome do .dat como foi baixado da nossa seção de downloads. Está no formato "ricardo tormo [002].dat", onde o número entre colchetes é a versão do arquivo. Não supervisionaremos qualquer projeto iniciado com um .dat Inacabado, nem os lançaremos em modo jogável até que sejam completados.

Hi,

We're opening a new folder in our downloads section, Unfinished .dats. This folder contains, as the name says, .dat files that were started, weren't finished and aren't on the to-do list for a near future. These files are meant for those learning track editing; they do not include a .wad file, required to work ingame.

Who downloads the files can do anything with them. If you want to develop an Unfinished .dat and release it, please be polite and fair, include the following text in the track's readme file:

This track is made from the unfinished .dat file **filename** from F1Virtual site, f1virtual.blogspot.com. Special thanks to Prblanco and Gildoorf.

Esta pista foi feita de um .dat inacabado
**filename** do site F1Virtual, f1virtual.blogspot.com. Agradecimentos especiais a Prblanco e Gildoorf.

**filename** is the .dat's filename as it was downloaded from here. It's format is "ricardo tormo [002].dat", where the number between brackets is the file version. We won't supervise any project started with an Unfinished .dat, nor we will release them in a playable version until they reach complete status.

Passo-a-passo: criando uma cc-line

Vamos ao próximo tutorial, esse é um tópico que de vez em quando aparece na minha caixa de entrada: a cc-line! É um processo faz bom uso do cérebro, darei algumas dicas que não são propriamente passos. Dito isso, ao trabalho!


Passo 1 - Antes de começar, abra seu arquivo .dat e selecione Fix cc-cars behaviour no menu Action. Também ligue a exibição da cc-line clicando no botão Show CC-Line da barra de ferramentas (seta da direita na figura).


Passo 2 - Na aba Physics, dê um clique duplo em CC-Line na parte esquerda da tela. Selecione Initial section, Del, All Following Sections. Agora você pode começar a fazer a cc-line para sua pista.


Passo 3 - Esta é a seção incial da cc-line, a única que restou. Length é o comprimento, Start Dfc é o deslocamento para a esquerda ou para a direita (aqui um valor de 1024 equivale a 1 unidade do GP4, 4,877 metros). Radius é o raio da curva em mílimetros, deixe o valor em zero para uma seção reta. Para uma descrição de Angle e ShiftAngle leia ao Guia do Usuário do GP4Builder, não usaremos estes valores aqui.


Passo 4 - Quero que a cc-line comece do lado direito da pista, então coloquei um valor positivo em Start Dfc (620 no exemplo), e estendi o comprimento para 60 setores. Para continuar, clique em Add na parte esquerda da tela, depois em Section.


Passo 5 - Vamos fazer a cc-line se aproximar da borda direita da pista. Isso pode ser feito com um raio grande, 1700000 em 20 setores neste exemplo. Lembre disso: raios grandes são para curvas suaves e abertas enquanto raios pequenos são para curvas fechadas e lentas. Valores menores que 2000 são desnecessários e podem fazer o jogo travar. Valores negativos viram à esquerda, e positivos à direita.


Passo 6 - Pouco depois chegamos à primeira curva. O ideal é contornar a curva com o maior raio possível, é isso que faremos. Coloque inicialmente um comprimento maior do que o necessário, então vá modificando os valores de raio até atingir o ponto mais interno da curva. Se a cc-line sai da pista por dentro (como na figura), o raio deve aumentar. Se ela sai por fora, o raio deve diminuir. Se ela atinge a parte de dentro da curva corretamente mas não alcança a extremidade da pista na saída, então diminua a seção anterior em um setor e ajuste o raio novamente.


Passo 7 - Note que, na minha solução, marquei a opção Curve 2. Isso significa que, ao invés de um círculo, esta seção de cc-line vai seguir uma elipse em que os dois valores de raio são os semi-eixos da elipse. Matemática fede? Bem, o que você precisa saber é que a seção de cc-line vai começar com o raio da Curva 1 e terminar com o raio da Curva 2. Neste exemplo, os carros irão mais rápidos com o passar da curva porque o raio aumenta. Seções com raio decrescente devem ser evitadas a menos que sejam realmente necessárias.


Passo 8 - Quando alcançar a linha de chegada, faça a última seção de cc-line passar além da linha, e faça-a conectar com os setores iniciais de cc-line tão bem quanto puder. Talvez precise ajustar setores anteriores para conseguir isso. A única maneira de saber se a cc-line está boa é ver carros cc dirigindo no jogo, então teste bastante até ficar satisfeito com os resultados.


Dica 1 - Existem algumas combinações de curvas que exigem um sacrifício da primeira curva em função da segunda, como a esquerda-direita nesta figura. O raio da curva à esquerda é suficiente apenas para contornar bem a curva que segue. Então sempre leve em conta o que vem adiante quando fizer uma cc-line. Vídeos onboard são muito úteis se estiver trabalhando numa pista real.


Dica 2 - Não use dois setores de cc-line numa mesma curva. Isso pode fazer com que os carros cc freiem no meio da curva para fazer o traçado da segunda seção. Isto pode ser evitado com um uso correto da opção Curve 2.


Dica 3 - Às vezes pode ser necessário usar pequenas seções de cc-line como ajuste, na entrada de uma curva por exemplo. Isto não leva ao problema da Dica 2 se a seção for pequena o suficiente para prevenir que os carros pisem novamente no acelerador, e dessa forma não irão frear uma segunda vez para seguir a seção seguinte.


Dica 4 - Uma cc-line pode ser melhorada conforme a pista progride. Zebras, elevações e inclinações podem alterar a melhor forma de fazer uma curva. Zebras principalmente! Não tenha medo de refazer toda a cc-line, se for para melhor. Até as das pistas originais podem ser melhoradas, lembre-se disso.

Aí esta, é bom lembrar também que o pitlane não tem cc-line: o traçado dos carros no pitlane é determinado pelos comandos de pitlane. O arquivo que usei para este tutorial está disponível em nossa seção de downloads, na pasta .dats Inacabados. Até a próxima!

Step-by-step: making a cc-line

On to the next tutorial, this one is a topic that every now and then appears at my mailbox: the cc-line! This process is much more brains than numbers, so I'll give some tips along the way. That said, let's get to work!
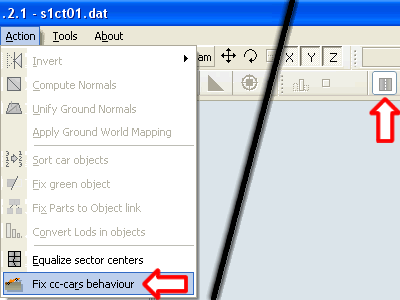

Step 1 - Before starting, open your .dat file and select Fix cc-cars behaviour from the Action menu. Also, turn on the cc-line display by clicking the Show CC-Line button on GP4Builder's toolbar (right arrow on the picture).
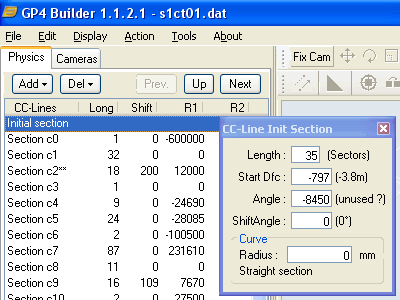


Step 2 - In the Physics tab, double-click CC-Line on the left of the screen. Select Initial section, Del, All Following Sections. Now you can start making the cc-line for your track.
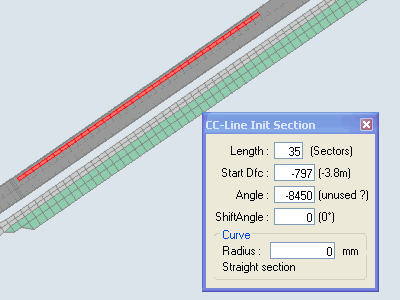


Step 3 - This is the initial section of the cc-line, the only one that's left. Length speaks for itself, Start Dfc is how much it is to the left or to the right of the track (here a value of 1024 equals 1 GP4 unit, 16 feet = 4.877 meters). Radius is the turn radius in milimeters, set it to zero if it's a straight. For a description of Angle and ShiftAngle refer to GP4Builder User Guide because we'll not be using them much here.
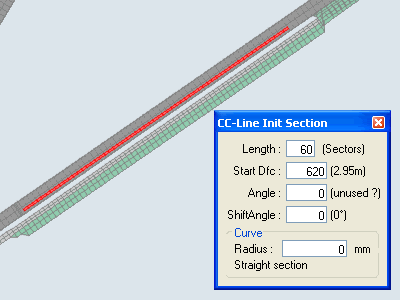


Step 4 - I want the cc-line to start in the right side of the track, so I set a positive value to Start Dfc (620 in this example), and I extended its length to 60 track sectors because there's a long straight to go. To go on, click on the Add button on the left of the screen, then Section.
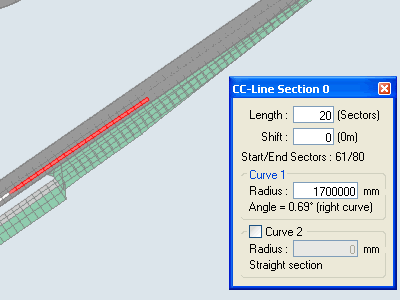


Step 5 - Now, let's make the cc-line go towards the right edge of the track as the first corner is a left-hander. This can be done slightly by setting a large radius, 1700000 over 20 sectors in this example. Remember this: a large radius gives slight, open turns while a small radius gives a tight, slow turn. Values smaller than 2000 are not of much use and may lead to game crashes. Negative values turn left and positive values turn right.
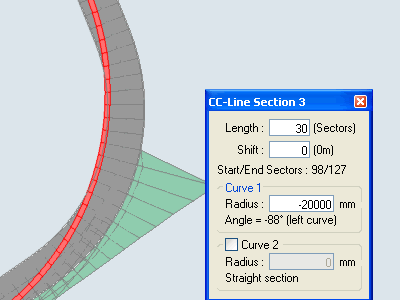


Step 6 - After a bit we arrive at the first corner. Cars aim to make the turn with the highest radius possible, so we need to do that. Set a lenght of more sectors than you'll need, then start playing with the radius until you hit the turn apex. If the cc-line goes off-track on the inside (like the picture), the radius is too small. If it goes off-track on the outside, the radius is too big. If it hits the apex correctly but does not hit the track edge on corner exit, then make the previous section one sector shorter and then adjust radius again.
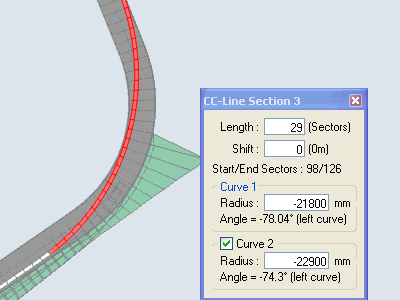


Step 7 - Notice that, in my solution, I checked the Curve 2 checkbox. This means that instead of a circle, this cc-line section will follow an ellipse in which the two radii values are actually the two semiaxes of that ellipse. No good at maths? Well, the only thing you need to know is that the cc-line section will start with the Curve 1 radius and finish with the Curve 2 radius. In this example, the cars will accelerate as the turn goes on because the radius increases. Sections with decreasing radius should be avoided unless they're really necessary.
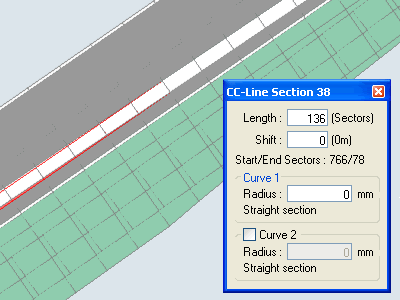


Step 8 - When you reach the start/finish line again, make the last cc-line section go after the line, and make its end contact with the first cc-line sectors as close as you can. You may need to adjust previous sectors to achieve that. You'll only know if your cc-line is good enough by watching computer cars driving in game, so be sure to test a lot until you're really satisfied with the results.
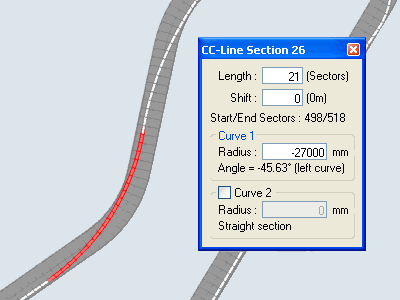


Tip 1 - There are some corner combinations that make you sacrifice the first corner in order to have a better line for the second one, like the left-right in this picture. The radius of the left turn is just enough to get a good line in the right corner that follows. So always make the cc-line looking at what you have in the following sectors. Onboard videos are very useful if you're working on a real track.
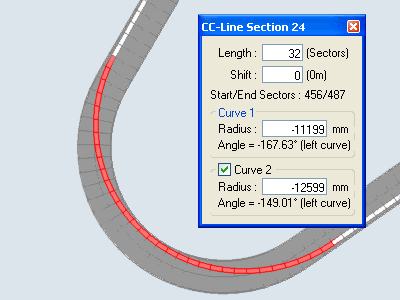


Tip 2 - Do not use two cc-line sections in the same corner. This can make cc-cars brake mid-corner when they approach the second section. This can be avoided by using the Curve 2 option correctly.
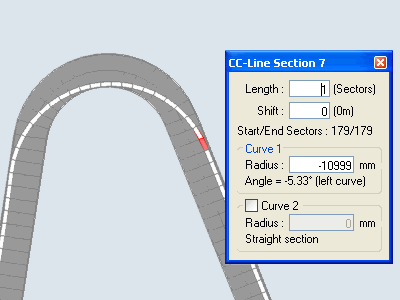


Tip 3 - Sometimes you may need to use very small cc-line sections to make an adjustment, for corner entry for example. This will not cause the problem from Tip 2 if the section is short enough for cc-cars not to hit the throttle again, so they will not brake a second time to enter the following section.
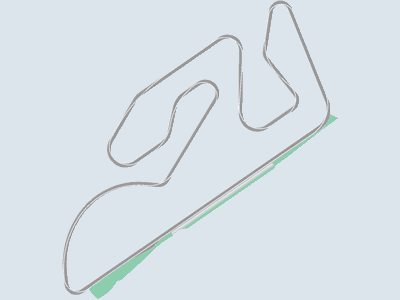


Tip 4 - A cc-line can be improved as you progress on your track, for example, kerbs, elevations and banking may change the best way to approach a corner. Specially kerbs! So don't be afraid to do your cc-line all over again, if it's for better. Even the ones from GP4 original tracks can be improved, keep that in mind.

There it is, also remember that pitlane does not have a cc-line of its own, instead the pitlane commands guide the cars through pitlane. The .dat file I used to make this tutorial is available in our downloads section, in the Unfinished .dats folder. See you later!

March 24, 2008

Road to Sakhir


Estive bem doente esses dias, por isso estava distante.
Mas adquiri nova máquina, e devo adiantar bem os trabalhos em casa mesmo.


I´ve been really sick these days, that´s why I was off.
But a brand new machine is here, to help me out on hurry things.

March 20, 2008

Prblanco responde

Nosso colega Jorge Paes resolveu entrevistar este que escreve esta mensagem... o resultado desse encontro você pode conferir no blog do Jorge Paes.

March 19, 2008

Downloads misteriosos

Olá,

Notei que alguns se interessaram pelo "Performance Calculator" que está na nossa seção de downloads. É uma pequena ferramenta que construí em Excel para construir arquivos de performance usados pelo GP4. Você entra com os tempos de volta dos pilotos (e alguns outros dados) e obtém um arquivo que tenta reproduzir no jogo as diferenças relativas entre os pilotos.

Hoje adicionei mais um download maluco, que é o "Sunlight Calculator". Este calcula a posição dos raios solares para uma pista nova baseado na hora, dia, mês e alguns valores insanos. Embora não tenha a pretensão de ser 100% preciso, usei-o na Sakhir do Gildoorf e fiquei bem satisfeito com os resultados.

Agora pelo menos vão saber o que estão baixando...

Hi,

I noticed some people were interested about the "Performance Calculator" that is in our downloads section. It's a little tool that I built on MS Excel to create performance files for GP4. You put the lap times of the drivers (and some other data) and get a file that tries to recreate ingame the differences among the drivers.

Today I added another crazy download, which is "Sunlight Calculator". This calculate the sunlight position for new tracks based on hour, day, month and some insane numbers. While it's not meant to be 100% accurate, I used it in Gildoorf's Sakhir and got pretty satisfied with the results.

Now at least you'll know what you're downloading...

March 13, 2008

Passo-a-passo: posicionando a entrada do pitlane

Este é o primeiro de uma série (espero!) de pequenos tutoriais que irão cobrir alguns itens da edição de pistas. Estes vêm como uma resposta a perguntas frequentemente questionadas a nós! Devido à grande quantidade de texto, as versões em português em inglês virão em mensagens separadas para facilitar a busca posteriormente. Então aí vai, o tópico de hoje é "Posicionando a Entrada do Pitlane".

Passo 1 - Digamos que você está construindo uma pista do zero, real ou fictícia, que não é baseada em um traçado existente. É praticamente certo que a entrada do pitlane não estará onde você quer, se estivesse seria algo como achar a galinha dos ovos de ouro. Então vamos colocá-lo no lugar.


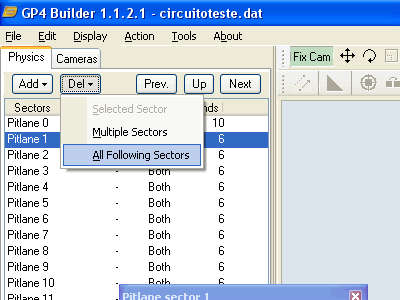
Passo 2 - Primeiro, é mais fácil trabalhar com um pitlane curto. Os setores existentes não serão de muita serventia mesmo. Na aba Physics, dê um clique duplo em Pit Lane Sectors, selecione Pitlane 1, então Del, All Following Sectors. Isto lhe deixará somente com os dois primeiros setores do pitlane.


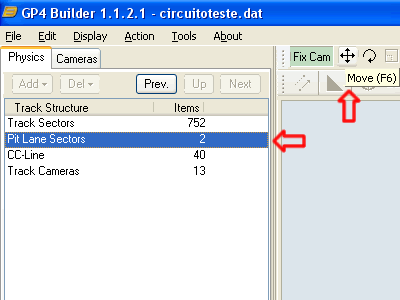
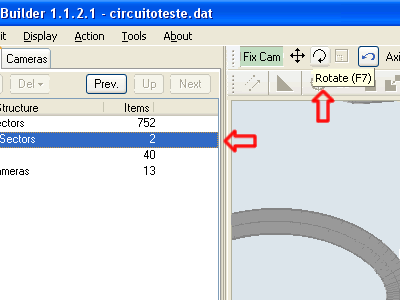
Passo 3 - Agora, clique em Up, Pit Lane Sectors e selecione a ferramenta Move, como na figura. Com isso, você pode mover o pitlane pela tela usando o botão esquerdo do mouse. Com o botão direito é possível mover o pitlane verticalmente.


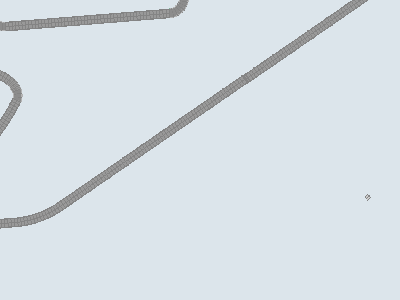
Passo 4 - Mova os setores do pitlane para sua posição apropriada. Esta deve ser pelo menos 5 setores de onde o pitlane realmente começa a deixar a pista e, se possível em uma reta, mas não se preocupe muito com isso nesse momento.


Passo 5 - Provavelmente o pitlane não estará orientado na mesma direção da pista. Então use a ferramenta Rotate junto com o mouse para girar o pitlane.


Passo 6 - Esta parte exige um pouco de atenção, pois como o pitlane gira ao redor do centro de coordenadas, muito provavelmente ele irá fugir do lugar que você tinha colocado antes. Apenas continue girando até achar que está na orientação correta, então use a ferramenta Move e coloque-o de volta no lugar desejado.


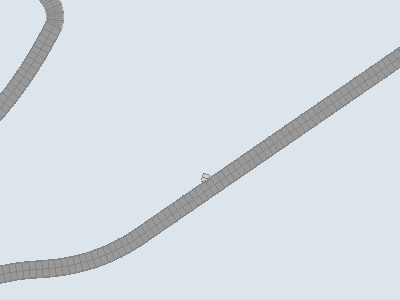
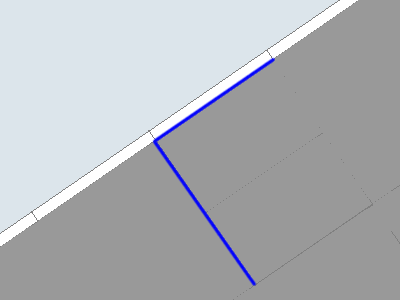
Passo 7 - Alterne entre mover e girar até conseguir alinhar os primeiros setores com a pista, de acordo com as linhas azuis na figura. Se conseguir encaixar o pitlane e a pista nestes dois pontos, acabou. Nesta figura, o setor de pitlane "zero" está à esquerda e o setor "um" à direita.


Passo 8 - Agora que está no lugar certo, apenas crie o resto do pitlane como faria com a pista. Tome cuidado na hora de alinhar a saída, neste caso mover os setores não é recomendado, ao invés disso construa-os de maneira que encontrem a pista de forma suave, sem a necessidade de movê-los manualmente.

É isso por enquanto!

Step-by-step: positioning pitlane entrance

This is a new in a series (hopefully!) of small tutorials that will cover some items of track editing. These come as an answer to some frequently asked questions to us! Due to the large amount of text, english and portuguese versions will come in separate messages for easier searching later. So here it comes, today's topic is "Positioning Pitlane Entrance"


Step 1 - Let's say you are building a track from scratch, either a real one or a fictional one, that is not based on one existing track layout. Most likely the pitlane entrance will not be where you want it to be, it's more like you found the golden goose if it is at the right spot. So let's put it where it belongs.


Step 2 - First, it is easier to work with a small pitlane. The existing sectors will not be of much use anyway. In the Physics tab, double-click Pit Lane Sectors, select Pitlane 1, then Del, All Following Sectors. This will leave you with just the two first pitlane sectors.


Step 3 - Now, press Up, click Pit Lane Sectors and select the Move tool, as shown in the picture. With this, you can move the pitlane using the left mouse button across the screen. Also, you can move it up and down with the right mouse button.


Step 4 - Move the pitlane sectors to their appropriate position. This should be at least 5 sectors from where the pitlane actually starts to leave the track, and if possible, on straight track sectors, but don't worry too much about this right now.


Step 5 - Most likely the pitlane will not be oriented correcly along the track. So use the Rotate tool together with the mouse to rotate the pitlane.


Step 6 - This is a little tricky part, as the pitlane rotates around the center of coordinates, so it most likely will go away from the place you have put it on before. Just rotate it until you think it's at the right direction, then use the Move tool and put it back in the desired place.


Step 7 - Go between Rotating and Moving until you can align the first sectors with the track, according to the blue lines on the picture. If you can match the pitlane and the track at these two points, it's done. In this picture, the pitlane sector "zero" is on the left and the sector "one" is on the right.


Step 8 - Now it's at the right place, just create the pitlane as you would do with the track. Just take care to make the exit aligned too, and in this case, Moving sectors is strongly discouraged, instead make them so they can meet the track smoothly without the need to Move them manually.

That's it for now!